Hardie Plank Replacement A Complete Guide

Hardie plank replacement isn’t just about fixing damaged siding; it’s about revitalizing your home’s exterior. This guide walks you through the entire process, from identifying the need for replacement to choosing the right materials and completing the installation. We’ll cover everything from understanding the common problems with Hardie plank to maximizing your home’s curb appeal with a fresh, updated look.
We’ll explore the various reasons why Hardie plank might need replacing, including weather damage, aging, and aesthetic preferences. We’ll also delve into the costs involved, providing a realistic budget breakdown to help you plan your project effectively. Finally, we’ll equip you with the knowledge and steps needed for a successful DIY project or to confidently discuss the process with contractors.
Understanding Hardie Plank Issues

Source: advanceroofingllc.com
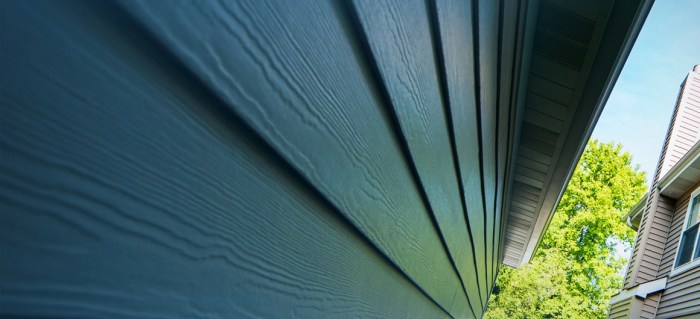
Hardie Plank siding, while known for its durability, isn’t immune to problems. Understanding the common issues and signs of deterioration is crucial for timely replacement and preventing more extensive damage to your home. Ignoring problems can lead to costly repairs down the line.
Several factors contribute to the need for Hardie Plank replacement. These range from the natural wear and tear expected over time to damage caused by extreme weather events or improper installation. Recognizing these issues early can save you significant time and money.
Common Reasons for Hardie Plank Replacement
Hardie Plank, despite its reputation for longevity, eventually shows signs of aging and damage. Several factors accelerate this process. Understanding these factors helps homeowners anticipate maintenance needs and plan accordingly.
- Age and Weathering: Even with proper maintenance, prolonged sun exposure, rain, and temperature fluctuations can cause fading, cracking, and warping over time. This is especially true in regions with harsh climates.
- Moisture Damage: Insufficient sealing around windows and doors, or damage to the underlying sheathing, can allow moisture to penetrate the siding, leading to rot, mold, and structural issues. This can manifest as discoloration or swelling of the planks.
- Impact Damage: Accidents, such as falling branches or hailstorms, can cause dents, cracks, and holes in the siding. These localized damages may seem minor but can compromise the integrity of the entire system.
- Improper Installation: Faulty installation, such as inadequate nailing or improper flashing, can result in early deterioration. This is often seen as gaps between planks or loose sections.
Signs Indicating a Need for Hardie Plank Replacement
Several visual cues signal that your Hardie Plank siding needs attention. Ignoring these signs can lead to more extensive and costly repairs.
- Significant Cracking or Warping: Large cracks or planks that are visibly warped indicate significant damage and potential water intrusion.
- Extensive Fading or Discoloration: While some fading is normal, significant and uneven discoloration often points to underlying problems like moisture damage.
- Visible Rot or Mold: The presence of rot or mold is a serious issue, requiring immediate attention and often necessitating replacement of affected sections.
- Loose or Missing Pieces: Loose planks or missing sections expose your home’s structure to the elements and should be addressed promptly.
Lifespan of Hardie Plank Siding Under Different Climate Conditions
The lifespan of Hardie Plank siding varies considerably depending on the climate. Harsh weather conditions accelerate deterioration, while milder climates allow for a longer lifespan.
| Climate | Estimated Lifespan (Years) | Considerations |
|---|---|---|
| Mild (e.g., Mediterranean) | 30-50+ | Minimal exposure to extreme temperatures and moisture |
| Moderate (e.g., Pacific Northwest) | 20-30 | Moderate exposure to rain and temperature fluctuations |
| Harsh (e.g., Coastal areas with high winds and salt spray) | 15-25 | Significant exposure to harsh weather, leading to faster deterioration |
These are estimates, and actual lifespan can vary based on factors like installation quality and maintenance.
Potential Consequences of Delaying Hardie Plank Replacement
Postponing Hardie Plank replacement can have serious repercussions for your home and your wallet. Early intervention is always more cost-effective than extensive repairs.
- Increased Water Damage: Cracks and gaps allow water to penetrate, leading to rot, mold growth, and structural damage to the underlying sheathing and framing.
- Higher Repair Costs: Small issues that could have been addressed with minor repairs can escalate into extensive and costly replacements if left unattended.
- Reduced Home Value: Visible damage to the siding significantly reduces the curb appeal and overall value of your home.
- Pest Infestation: Damaged siding can provide entry points for insects and rodents, leading to infestations and further damage.
Replacement Materials & Costs
Replacing Hardie Plank siding is a significant investment, so understanding the various materials and associated costs is crucial. This section will explore alternative siding options, detail the cost breakdown of a Hardie Plank replacement, and offer a sample budget to help you plan your project.
Siding Material Comparison
Choosing the right replacement material depends on your budget, desired aesthetic, and the longevity you expect. Here’s a comparison of popular options:
| Material | Cost (per sq ft) | Durability | Aesthetic Appeal |
|---|---|---|---|
| Hardie Plank (Fiber Cement) | $3-$8 | High (50+ years) | Versatile, can mimic wood |
| Vinyl Siding | $1-$4 | Moderate (20-30 years) | Wide range of colors and styles, but can look less natural |
| Aluminum Siding | $2-$5 | High (50+ years), but prone to dents | Modern, sleek appearance; limited color options |
| Wood Siding | $4-$10+ | Moderate (20-30 years), requires high maintenance | Classic, natural look; high variability in quality |
Note: Prices are estimates and can vary based on location, material quality, and supplier.
Hardie Plank Replacement Cost Breakdown
The average cost of Hardie Plank replacement ranges from $8 to $15 per square foot, including both materials and labor. This translates to a total cost of $8,000 to $15,000 for a 1,000 square foot house. However, this is a broad estimate.
Factors Influencing Overall Cost
Several factors significantly influence the final cost:
* House Size: Larger houses naturally require more materials and labor, increasing the overall cost. A 2,000 square foot house will cost significantly more than a 1,000 square foot house.
* Labor Costs: Labor rates vary by region and the contractor’s experience. Highly skilled and experienced contractors command higher rates.
* Material Choices: Higher-end Hardie Plank products or opting for premium alternatives will increase material costs. For example, choosing a specific texture or color might affect pricing.
* Complexity of the Job: Houses with intricate architectural details or significant damage require more time and effort, thus increasing labor costs. Repairing underlying sheathing before installing new siding can add significantly to the total.
* Permits and Inspections: Obtaining necessary permits and scheduling inspections adds to the overall project expense. These costs vary by location.
* Waste Removal: Proper disposal of old siding and debris contributes to the final cost.
Sample Budget for Hardie Plank Replacement
This budget is for a 1,000 square foot house and serves as an example. Adjust figures based on your specific project requirements.
| Item | Estimated Cost |
|---|---|
| Materials (Hardie Plank, fasteners, etc.) | $5,000 – $8,000 |
| Labor | $3,000 – $7,000 |
| Permits and Inspections | $500 – $1,000 |
| Waste Removal | $200 – $500 |
| Total Estimated Cost | $8,700 – $16,500 |
Remember, this is just a sample budget. It’s crucial to get detailed quotes from multiple contractors to accurately estimate the cost of your specific project.
The Replacement Process

Source: everwinpneumatic.com
Replacing Hardie Plank siding is a multi-step process requiring careful planning and execution. Success hinges on proper removal of the old siding, meticulous installation of the new, and attention to detail in ensuring a seamless final product. This section details the steps involved, from initial removal to final finishing.
Removing Old Hardie Plank Siding
Begin by carefully inspecting the existing siding to identify any areas of significant damage or deterioration beyond simple replacement. This assessment will help determine the scope of the project and inform material purchasing. Next, start removing the siding, working from the top down. Use a pry bar to carefully lift and remove each plank, taking care not to damage the underlying sheathing or the new siding. Always wear appropriate safety gear, including gloves and eye protection. Dispose of the old siding responsibly, following local waste disposal regulations. For areas with particularly stubborn planks, consider using a reciprocating saw with a fine-tooth blade to cut through the nails before prying. Remember to work methodically, section by section, to maintain order and avoid accidental damage.
Installing New Hardie Plank Siding
Once the old siding is removed, inspect the underlying sheathing for any damage. Repair any damaged areas before installing the new siding. Begin installation at the bottom of the wall, ensuring the first plank is perfectly level and aligned. Use galvanized nails or screws designed for Hardie Plank, spacing them according to the manufacturer’s recommendations. Maintain consistent spacing and alignment throughout the installation process. For corners and other complex areas, use specialized trim pieces designed for Hardie Plank to create a clean and professional finish. Remember to leave appropriate expansion gaps as specified by the manufacturer to allow for movement due to temperature fluctuations. Overlapping planks should be consistent and accurately aligned to ensure a weather-tight seal. Using a level and measuring tape frequently will help maintain accuracy and prevent errors that could compromise the overall aesthetic and functionality of the new siding.
Ensuring a Seamless Transition
To ensure a seamless transition between old and new siding (if only a portion is being replaced), it’s crucial to carefully match the color and texture of the new siding to the existing siding. If there’s a noticeable color difference, consider pre-treating the new siding with a primer or paint to blend it with the old siding. Pay close attention to the alignment of the planks at the transition point. Using trim pieces to conceal the join is a common and effective technique. Careful caulking and sealing around all joints and seams is essential to prevent water penetration. Always choose high-quality caulking specifically designed for exterior applications and weather conditions in your area. A final inspection should be done to check for any gaps or misalignments.
Necessary Tools and Materials
A successful Hardie Plank replacement project requires careful planning and the right tools and materials. Here’s a checklist:
- Pry bar
- Reciprocating saw with fine-tooth blade
- Hammer or impact driver
- Galvanized nails or screws (appropriate size and length)
- Measuring tape
- Level
- Safety glasses
- Work gloves
- Caulk gun and exterior-grade caulk
- Hardie Plank siding (appropriate quantity and color)
- J-channels, corner trim, and other necessary trim pieces
- Utility knife
- Ladder (if needed)
Remember to always consult the manufacturer’s instructions for your specific Hardie Plank product for detailed installation guidelines. Proper preparation and careful execution are key to a successful and long-lasting siding replacement project.
Maintenance & Prevention
Investing a little time in regular maintenance will significantly extend the life of your new Hardie Plank siding and prevent costly repairs down the line. Proper care involves both proactive measures to prevent problems and routine inspections to catch minor issues before they escalate. This section Artikels a simple maintenance schedule and highlights key preventative strategies.
A Maintenance Schedule for Hardie Plank Siding
A consistent maintenance plan is crucial. Think of it like regular car maintenance – small efforts prevent major breakdowns. The following schedule Artikels recommended tasks:
- Annual Inspection: A thorough visual inspection of all siding surfaces, paying close attention to seams, corners, and areas prone to moisture buildup (e.g., near ground level or around windows and doors). Look for cracks, discoloration, loose or damaged pieces, and signs of pest infestation.
- Spring Cleaning: Gently wash the siding with a pressure washer set to a low pressure setting (avoiding high pressure which can damage the surface). Use a mild detergent solution and rinse thoroughly. This removes dirt, mildew, and cobwebs, keeping the siding looking its best and preventing buildup that can lead to deterioration.
- Fall Inspection: Another visual inspection focusing on damage that might have occurred during the summer months, such as storm damage or insect activity.
Preventative Measures to Avoid Future Hardie Plank Issues
Proactive steps can significantly reduce the likelihood of problems. This includes addressing potential issues before they become major problems. For instance, promptly repairing any damaged sections prevents water ingress.
- Proper Caulking and Sealants: Regularly inspect and reapply caulk around windows, doors, and other penetrations in the siding. This prevents water from seeping behind the siding and causing rot or damage. Choose high-quality, exterior-grade caulk designed for long-term durability in varying weather conditions.
- Gutter and Downspout Maintenance: Ensure gutters and downspouts are clean and functioning correctly to divert water away from the foundation and siding. Clogged gutters can lead to water damage, potentially causing significant issues to your siding. Regular cleaning, ideally twice a year (spring and fall), is essential.
- Landscaping Management: Keep vegetation trimmed away from the siding to improve airflow and prevent moisture buildup. Overgrown bushes or trees can trap moisture against the siding, promoting mold and mildew growth. Maintaining a sufficient distance between landscaping and the house is crucial.
Common Mistakes to Avoid During Installation and Maintenance
Avoiding common errors during both installation and maintenance is vital. Neglecting these steps can lead to premature deterioration and costly repairs. Proper techniques ensure longevity.
- High-Pressure Washing: Using excessively high pressure during cleaning can damage the surface of the Hardie Plank siding, leading to scratches and potential water damage. Always use a low-pressure setting and maintain a safe distance from the surface.
- Improper Caulking: Using low-quality caulk or failing to properly seal gaps and seams can allow water to penetrate the siding, causing damage over time. Ensure that all joints and penetrations are thoroughly sealed with a high-quality, exterior-grade caulk.
- Ignoring Minor Damage: Small cracks or dents, if left unattended, can worsen, leading to larger, more expensive repairs. Address minor damage promptly to prevent further deterioration.
The Importance of Regular Inspections for Early Detection of Problems
Regular inspections are the cornerstone of preventative maintenance. Early detection allows for timely repairs, preventing small problems from becoming major, costly issues. Think of it as preventative medicine – early diagnosis leads to easier and less expensive treatment.
- Visual Inspection: A careful visual inspection can identify issues like loose siding, cracks, discoloration, or signs of pest infestation. This allows for prompt repairs, preventing further damage and potential structural problems.
- Touch and Feel Inspection: Feel the siding for any unusual softness or sponginess, which might indicate water damage or rot. This is especially important in areas prone to moisture accumulation.
- Documentation: Keeping records of your inspections, including dates and any noted issues, is highly beneficial. This allows you to track the condition of your siding over time and easily identify any emerging trends or problems. A simple spreadsheet or photo log can be very effective.
Visual Examples of Hardie Plank Replacements
Source: thesidingking.com
Seeing is believing, and when it comes to home improvements as significant as siding replacement, visual examples can be incredibly helpful. This section showcases three diverse Hardie Plank replacement projects, highlighting the transformation and the impact of different siding choices. We’ll explore the before-and-after scenarios, emphasizing the aesthetic improvements achieved.
Let’s dive into some real-world examples of Hardie Plank replacement projects and the visual impact of different siding options.
Three Hardie Plank Replacement Scenarios
The following examples illustrate the variety of outcomes possible with Hardie Plank replacement. Each project faced unique challenges and presented different aesthetic goals.
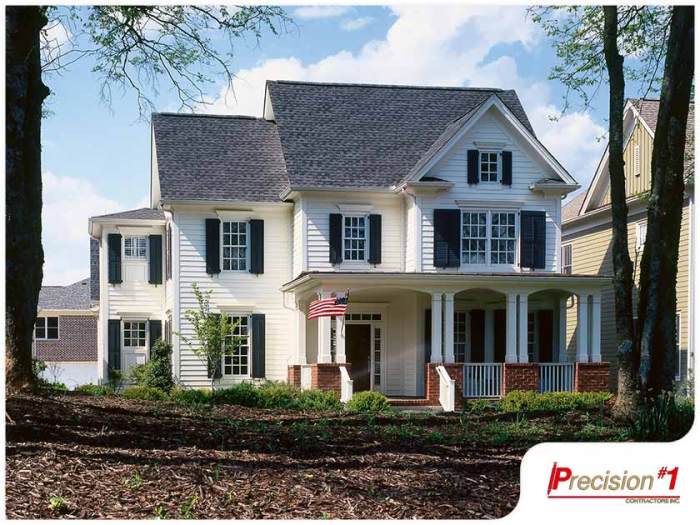
- Scenario 1: The Dated Ranch. Before: This 1970s ranch house featured faded, cracked, and slightly warped Hardie Plank in a muted beige. The overall look was tired and lacked curb appeal. After: The old siding was replaced with a deep charcoal gray Hardie Plank. The new color dramatically modernized the home’s appearance, creating a sleek and contemporary look. The consistent color and the improved condition of the siding instantly upgraded the property’s visual appeal. Adding crisp white trim further enhanced the contrast and gave the house a clean, defined silhouette.
- Scenario 2: The Victorian Revival. Before: A charming Victorian home suffered from significant damage to its original Hardie Plank siding due to age and weather. Sections were missing, others were severely deteriorated, and the paint was peeling. The overall effect was one of neglect and disrepair. After: Instead of replacing with Hardie Plank, the homeowners opted for a more historically appropriate cedar shake siding. This choice maintained the home’s original character while addressing the structural issues. The warm tones of the cedar contrasted beautifully with the dark trim and created a rich, inviting façade. This example demonstrates that Hardie Plank replacement doesn’t always mean using the same material.
- Scenario 3: The Modern Farmhouse. Before: A newly built modern farmhouse featured standard Hardie Plank in a light gray. While functional, the siding lacked personality and didn’t fully complement the home’s architectural style. After: The homeowners chose a contrasting combination of dark gray Hardie Plank lap siding and a lighter gray Hardie Plank vertical siding. This created visual interest and highlighted the home’s unique architectural features. The interplay of textures and shades provided a modern and sophisticated look, enhancing the farmhouse aesthetic significantly. This project highlights how texture can be used to create visual depth and interest.
Visual Impact of Different Siding Choices
The choice of replacement siding significantly impacts a home’s overall appearance. Moving beyond Hardie Plank opens up a world of possibilities. For instance, using vinyl siding can offer a more budget-friendly option with a wide range of colors and styles, while fiber cement alternatives, like those offered by James Hardie, provide durability similar to Hardie Plank but with different textures and profiles. Natural wood siding, such as cedar or redwood, offers a classic and elegant look, but requires more maintenance.
Aesthetic Improvements in a Hardie Plank Replacement Project
One project involved a two-story colonial home with severely weathered Hardie Plank. The original light brown siding was dull and showed significant signs of age. The replacement involved installing a rich, deep red Hardie Plank. This bold color choice immediately revitalized the home’s exterior. The new siding’s smooth, consistent finish contrasted sharply with the previously uneven and faded surface. Further enhancing the aesthetic improvement was the addition of crisp white trim around the windows and doors, creating a striking visual contrast and emphasizing the architectural details of the house. The transformation was dramatic, showcasing how a simple color change can dramatically increase a home’s curb appeal.
Enhancing Curb Appeal Through Color and Texture
The right color and texture of replacement siding can dramatically enhance a home’s curb appeal. For example, a home with a traditional design might benefit from warm earth tones, such as browns and creams, while a modern home might look stunning with cool grays or deep blues. The texture of the siding also plays a crucial role. Smooth siding creates a clean, modern look, while textured siding adds depth and visual interest. Combining different colors and textures, as in Scenario 3 above, can create a truly unique and eye-catching exterior. Careful consideration of these elements can significantly increase the value and attractiveness of a property.
Final Thoughts: Hardie Plank Replacement
Source: amazonaws.com
Replacing your Hardie plank siding is a significant home improvement project, but with careful planning and execution, it can dramatically enhance your home’s value and curb appeal. Remember, regular inspection and preventative maintenance are key to extending the life of your new siding. By following the steps Artikeld in this guide and addressing any potential issues proactively, you can enjoy a beautiful and long-lasting exterior for years to come. Don’t hesitate to seek professional help if you’re unsure about any aspect of the process.
Frequently Asked Questions
Can I replace Hardie plank siding myself?
While possible for smaller areas, replacing Hardie plank requires specific skills and tools. Larger projects are best left to professionals for optimal results and safety.
How long does Hardie plank replacement take?
The timeframe varies greatly depending on the size of the project, the complexity of the work, and weather conditions. Expect several days to several weeks for a full home exterior.
What is the warranty on replacement siding materials?
Warranties differ depending on the manufacturer and material. Always check the manufacturer’s specifications for details on coverage and duration.
What if I find mold or rot during the removal process?
Addressing mold or rot is crucial before installing new siding. Contact a professional for safe and effective remediation to prevent future issues.
How do I choose the right color and style of replacement siding?
Consider your home’s architectural style, surrounding landscape, and personal preferences. Sample boards can help visualize different options before making a final decision.
Comments are closed.